Accomplishments
- Collisions & Hitboxes
- Objected Oriented Code
- Player Controls
- Game Features
- Unadded Technicals
- Numbers & Statistical Data (Commits, Additions)
Collisions & Hitboxes
Hitboxes and collisions, as we all know, are an essential asset for having a game. From pong to the most complex of modern games, without collision and hitbox detection, there can be no game. So knowing such, I took it upon myself to design a system in which could be used in order to detect collision, as we were planning to have interaction between a player & an enemy. The exact details on the subject won’t be covered here as it was already talked about in more detail in the blogs linked at the bottom. However, a summary will be provided here and what was learned along the way.
Hitboxes
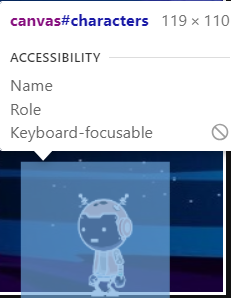
First, we’ll talk about hitboxes. Hitboxes are given by default to sprites, however, it’s a common theme that these sprites don’t have an accurate hitbox relative to their size. Take a look below. It’s a screenshot of our default player hitbox which is obviously much bigger than the player, hence causing a problem. To solve this issue, we have to manipulate/create properties within the player & enemy to make a custom hitbox.
Collision & Hitbox Blogs:
export class CharacterPlayer extends Character {
  constructor(playerCanvas, image, speedRatio) {
      // Define the hitbox as a separate object
      const hitbox = {
          width: 50,
          height: 50,
      };

      //Sets the hitbox as the propety of the player
      this.hitbox = hitbox;
  }

  //Updates the Position of the hitbox to match the player
  updateHitbox() {
      this.hitbox.x = this.x
      this.hitbox.y = this.y
  }
}
You’ll see that creating a hitbox for the player was much easier than anticipated. First, one must define the hitbox and give it dimensions, the dimensions will be used for the player hitbox. Once this is done, define the hitbox as a property of the player. this.hitbox = hitbox just means this, aka the player will have a property called hitbox which equals to the hitbox const which has a width and height of 50. Now, we just have to create another function to make sure the hitbox of the player is continually overlayed onto the player’s current position.
This exact same code can be replicated for the enemy. Now that we have hitboxes that more accurately represent the player’s size, it’s time to use collisions to create interaction between the two players.
Collisions
To add collisions, I used the most common and simplest method used for 2d games. It’s called AABB collision detection. It’s especially useful for rectangular hitboxes such as what we have. The code checks the positioning of the sides of each object and uses that information to presume whether or not the two objects are touching each other. If they are touching (the conditions are met to deem such so), then code will be run dictating what should happen in the event of a collision. Our code, when the player and enemy touch, causes the game to end.
 //Checks for collision between the player & enemy
 function checkCollisions(playerObj, enemyObj) {
  if (
      playerObj.hitbox.x < enemyObj.hitbox.x + enemyObj.hitbox.width &&
      playerObj.hitbox.x + playerObj.hitbox.width > enemyObj.hitbox.x &&
      playerObj.hitbox.y < enemyObj.hitbox.y + enemyObj.hitbox.height &&
      playerObj.hitbox.y + playerObj.hitbox.height > enemyObj.hitbox.y
  ) {
      //If there is collision, run the endGame function
      endGame();
  }
}
You’ll see in the code here that the code uses the hitbox property to measure collision, and that once all the conditions for collisons were met, the game would end.
Objected Oriented Coding
OOP was certainly the most challenging thing to implement into my game, even while using Mr. Mortensen’s code as a template for constructing my own code. Modifying or adding new things into the game became a great challenge as the code was no longer as easily understood as when it was compiled into a single file. This was especially the case when multiple different files inherited functionality from one JavaScript file, such as GameObject.js. While OOP is still a new topic for myself and my team, we did learn plenty in the making of our game.
Below is the list of different files we used to organize our JavaScript code:
- Background.js
- Character.js
- Enemy.js
- GameEnv.js
- GameObject.js
- GameOver.js
- Player.js
- Score.js
One of the main things I learned were classes & constructors, which specify the properties that each object needs in such an object
class GameObject {
  constructor(canvas, image, speedRatio) {
      this.x = 0;
      this.y = 0;
      this.frame = 0;
      this.canvas = canvas;
      this.ctx = canvas.getContext('2d');
      this.image = image;
      this.width = image.width;  // Image() width (meta data)
      this.height = image.height; // Image() height
      this.aspect_ratio = this.width / this.height;
      this.speedRatio = speedRatio;
      this.speed = GameEnv.gameSpeed * this.speedRatio;
  }
}
This is the code for the GameObject class. You’ll see within the class, there is a constructor with many different properties. Each one of these properties is absolutely necessary for an object in the game. Such properties includes making sure the canvas of each object is 2d, which allows for the animation of objects for JavaScript on canvases & the frames of the object will start at 0 so the animations are started correctly. You’ll also see properties that take parameters, as those properties are unique to the object, such as the image, canvas, speedRatio, etc.
These classes can then be connected to other classes.
import GameObject from './GameObject.js';

export class Background extends GameObject {
    constructor(canvas, image, speedRatio) {
        super(canvas, image, speedRatio);
    }
    update() {
        this.x = (this.x - this.speed) % this.width;
    }
    draw() {
        this.ctx.drawImage(this.image, this.x, this.y);
        this.ctx.drawImage(this.image, this.x + this.width, this.y);
    }
}
You can see how the Background class extends to the GameObject class so it not only uses its own unique attributes, but also uses all of the attributes given by the GameObject class. It’s also a good point to note how these separate files have access to each other’s code. This can be done by importing the class, function, variable, whatever of your choosing from the given file. You’ll see how the GameObject class is imported from the GameObject.js file and that’s how the Background class can extend to the GameObject class.
The main index file shows this clearly
import GameEnv from '/xavier/assets/js/GameEnv.js';
import { initBackground } from '/xavier/assets/js/Background.js';
import { initPlayer} from '/xavier/assets/js/Player.js';
import { initEnemy} from '/xavier/assets/js/Enemy.js';
import { endGame, gamePaused } from '/xavier/assets/js/GameOver.js';
import {getScore, score} from '/xavier/assets/js/Score.js';
It can be said without a doubt that classes, constructor, imports, and exports that I’ve been showing are the heart of OOP. They allow for separate code to connect and interact with each other, while being much more organized than if all the code were combined together. While I still struggle implementing OOP, it’s undoubtedly something I’ll continue to use going forward.
Player Controls
Another technical achievement I contributed to the game was the controls for the players, specifically the jumping of the player, something that was much more of a challenge that once imagined. Moving left & right didn’t serve to be of any issue. The code was as simple as it gets.
//Logic for moving the Player to the Left
if (this.frameY === PlayerAnimation.a.row && !this.isIdle) {
  this.x -= this.speed;
}

//Logic for moving the Player to the Right
else if (this.frameY === PlayerAnimation.d.row && !this.isIdle){
  this.x += this.speed;
}
switch (keyCode) {
  case 65: // 'A' key
      player.setFrameY(PlayerAnimation['a'].row);
      player.setMaxFrame(PlayerAnimation['a'].frames);
      player.isIdle = false;
      player.isFacingRight = false;
      break;
  case 68: // 'D' key
      player.setFrameY(PlayerAnimation['d'].row);
      player.setMaxFrame(PlayerAnimation['d'].frames);
      player.isIdle = false;
      player.isFacingRight = true;
      break;
}
The code here was made so when the player presses the A or D key, the player will move accordingly. All that has to be done is subtract or add to the player’s x value to move it around. This part was quite straight forward, but the jumping part served to be the issue at hand.
It’s not as simple as changing the y value. The player must go into the air, slow down the higher it gets, and then accelerate back to the ground. To do this, we first have to define the different variables in which the player must have for jumping. The player would need velocity, gravity, and detection to whether or not the player was jumping.
//Jumping Properties
this.velocityY = 0;
this.gravity = 0.5;
this.isJumping = false;
Now that we have all the variables we need, we can use apply them to a function which controls the actual functionality to make the player jump.
jump() {
  if (!this.isJumping) {
      this.isJumping = true;
      this.velocityY = -15;
  }
}
//Logic for moving the Player Upwards
if (this.isJumping) {
  this.y += this.velocityY;
  this.velocityY += this.gravity;

  if (this.y >= 523.6) {
      this.isJumping = false;
      this.y = 523.6;
  }
}
The first bit of code is a jump function, which we will be used later. It basically states that if the player is not jumping & the function is ran, then tell the computer that the player is now jumping and set the velocityY to be -15.
The second bit of code then uses these variables to change the player’s position. The player’s y decreasing, and as that’s happening velocityY slowly increases back to 0 as the gravity value is being added on. Once the player has a y that is greater than or equal to 523.6, then tell the computer that the player should no longer be jumping and to sets its y back to the floor.
case 87: // 'W' key
  player.jump();
  player.setFrameY(PlayerAnimation['w'].row);
  player.setMaxFrame(PlayerAnimation['w'].frames);
  player.isIdle = false;
This is where the jump function is called, making it so whenever the W key is pressed, the code above is initiated and the player will perform a jump. Much more logic than moving left or right, but still quite intuitive once completed.
Game Features (Big & Small)
What’s often overlooked by those whom play games, are all the small details in the game, that aren’t often noticeable, but behind the scenes took much effort to implement, and are of great accomplishment to the developer. This is what this section covers. We’ll start with the bigger features first.
Score
Having a score in the way that we did was initially planned, but due to a lack of time to finish the game we were going to have, we had to make a few compromises. In such, I made a feature that gave users points each time they escaped the enemy.
let score = 0;

//Adds to Score & Updates Display
function incrementScore() {
    score += 5;
    updateScoreDisplay(); // Call the function to update the score display
}

//Returns the Score
function getScore() {
    return score;
}

//Updates Score Display
function updateScoreDisplay() {
    const scoreDisplay = document.getElementById('scoreDisplay'); //Gets the scoreDisplay with the ID
    if (scoreDisplay) {
        scoreDisplay.textContent = `Score: ${getScore()}`; //Updates the score
    }
}

//Exports Functions
export { incrementScore, getScore, score };
This isn’t the entirety of the code in which I used for my score, but it covers the most important elements. You’ll see how there is a function to add to the score, to retrieve the score, and to display the score. You’ll also see at the end that two functions and one variable are exported out of the file to be used elsewhere.
incrementScore & score are used in Enemy.js to add to the score or to add special events when certain conditions are reached.
else if (this.domainOffset > this.domain * 2) {
  this.domainOffset = 0; // reset the counter back to 0
  incrementScore(); //add 5 to the score
//If Enemy reaches right side, add 5 to the score
} else if (this.domainOffset === this.domain) {
  incrementScore();
}
if(score===10 && this.enemySpeed===4) {
  this.enemySpeed += 4;
};
Here, 5 is added to the score (aka incrementScore()) every time the Enemy reaches one end of the canvas. It also states when the score is 10, the speed of the Enemy should permanently be increased to make the game more challenging.
In the main file there is a line of code to add sound effects when the score is 20. This is where getScore() is used.
// Check if the score reaches 20
if (getScore() === 20) {
  if (!sound)
      playWinnerSound()
      sound = 1;
}
So, adding a score composed of displaying the score, adding to that score based on certain conditions, exporting those functions to be accessible to other files, and utilizing the score to add special events. Definitely, with more time, this feature could have been much more heavily involved in the game’s design.
Game Over
Game Over was added to give collisions between the player and enemy value. For something to actually occur. Two things are to happen when the game ends. The game should be paused (nothing should be moving anymore), and it should be indicated that the game has ended to the user.
let gamePaused = false;

// Function to end the game (customize this according to your game logic)
function endGame() {
    gamePaused = true; // Pause the game

    // Display the "Game Over" text on top of the black canvas
    const gameOverMessage = document.createElement("div");
    gameOverMessage.innerText = "Game Over!";
    gameOverMessage.style.fontSize = "48px";
    gameOverMessage.style.color = "red";
    gameOverMessage.style.position = "absolute";
    gameOverMessage.style.top = "50%";
    gameOverMessage.style.left = "50%";
    gameOverMessage.style.transform = "translate(-50%, -50%)";
    document.body.appendChild(gameOverMessage);
}

export { endGame, gamePaused };
This code meets both needs. It has big red text, telling that the user that the game has ended, and pauses the game. It does this by setting gamePaused to true, which stops the game from updating.
  // Game loop
  function gameLoop() {
    if (!gamePaused) {

        //Draws and updates background animation
        backgroundObj.update();
        backgroundObj.draw();

        //Draws and updates player animation
        playerObj.update();
        playerObj.draw();

        //Draws and updates enemy animation
        enemyObj.update();
        enemyObj.draw();

        //Updates Hitboxes for both the player & enemy
        playerObj.updateHitbox();
        enemyObj.updateHitbox();

        //Checks for collisions between the player and enemy
        checkCollisions(playerObj, enemyObj);

        requestAnimationFrame(gameLoop);  // cycle the game, aka recursion
    }
}
You can see how everything in the game is updated here. You’ll as note that the code only works when !gamePaused, which means the code will only run when gamePaused = false. However, when collision between the enemy and player are detected, gamePaused will then equal true, causing the game to stop. The only other thing at this point that needs implementation, is calling upon the endGame() function where collision is detected. Below shows how it is do so.
function checkCollisions(playerObj, enemyObj) {
  if (
      playerObj.hitbox.x < enemyObj.hitbox.x + enemyObj.hitbox.width &&
      playerObj.hitbox.x + playerObj.hitbox.width > enemyObj.hitbox.x &&
      playerObj.hitbox.y < enemyObj.hitbox.y + enemyObj.hitbox.height &&
      playerObj.hitbox.y + playerObj.hitbox.height > enemyObj.hitbox.y
  ) {
      //Run endGame function
      endGame();
  }
}
Other Features
Games are always full of the additions of small features, and this game would be no exception. These additions often come up to solve minor or major problems, one such problem affected the animation of the player. The animation of the player was simply too fast and would be of much notice to others, so I made a solution. There would be a delay in the animation, so only after the player updated twice would the next of the animation happen.
//Delays Frame Animation
frameCounter++
if (frameCounter >= frameUpdateDelay) {
    frameCounter = 0;
    // Update animation frameX of the object
    if (this.frameX < this.maxFrame) {
        this.frameX++;
    } else {
        this.frameX = 0;
    }
}
This was the code used for this problem. The code to update the frameX animation of the player was already there, so I just had encapsulated that code within my delay code which states if frameCounter is greater than or equal to frameUpdateDelay, then the animation can run, and reset frameCounter so it can continuously delay the player. The variables frameUpdateDelay & frameCounter are defined way before in the code.
//Variables to Delay Animation timing
let frameUpdateDelay = 2;
let frameCounter = 0;
frameUpdateDelay slows down the animation the higher it is, as the higher the number the more the player updates itself before changing its animation. This was also used for the enemy, and was probably one of my favorite small additions to the game. A small, but very effective change.
There are plenty of other of these small achievements, many of which include findings that never made the game, which leads us into our next topic. Technicals that weren’t implemented in the game but were significant nonetheless.
Unadded Technicals
We had multiple different things we couldn’t add into other game, but I’ll speak for my own technicals. One of the major things we would have added was adding randomization to our game. I’ll quote from my own blog, what I said about randomization, “Randomization is an important asset for all games to have. They allow an experience to be unique and every time, which engages the users whom play the game.” Unfortunately, our game wasn’t at the point where we could add such features.
However, it wasn’t for waste. I ended up making three tangibles. Rock Paper Scissors, Coin Flip, & Rock Paper Scissors 2. I learned randomization, ternary operators, parameters, interpolation, how to use local storage, local and global scopes, methods, etc. This branch away from the game, these separate games that I made were almost as fruitful in learning than the actual game.
//Define Head & Tails Variables
let heads = 0;
let tails = 0;

//Flip the Coin
let flip = Math.random();

//If flip is less than or equal to 0.5, count it as tails, else count it as heads
flip <= 0.5 ? tails++ : heads++

//Log how many times heads & tails have landed
console.log(`Heads has been landed ${heads} time(s)`)
console.log(`Tails has been landed ${tails} time(s)`)
These few lines of code show many technical achievements already. Using randomization, using ternary operators, and using interpolation. My Rock Paper Scissors game uses such tactics and much more as well.
Numbers & Statistical Data
As of writing this, I have 86 commits & 3,400 additions on my team’s game repository. For perspective, my other team members, whom also contributed much, have a combined total of 90 commits to the game. I continued, by every passing week to learn more, to do more work, and to make a hopefully, functional game.
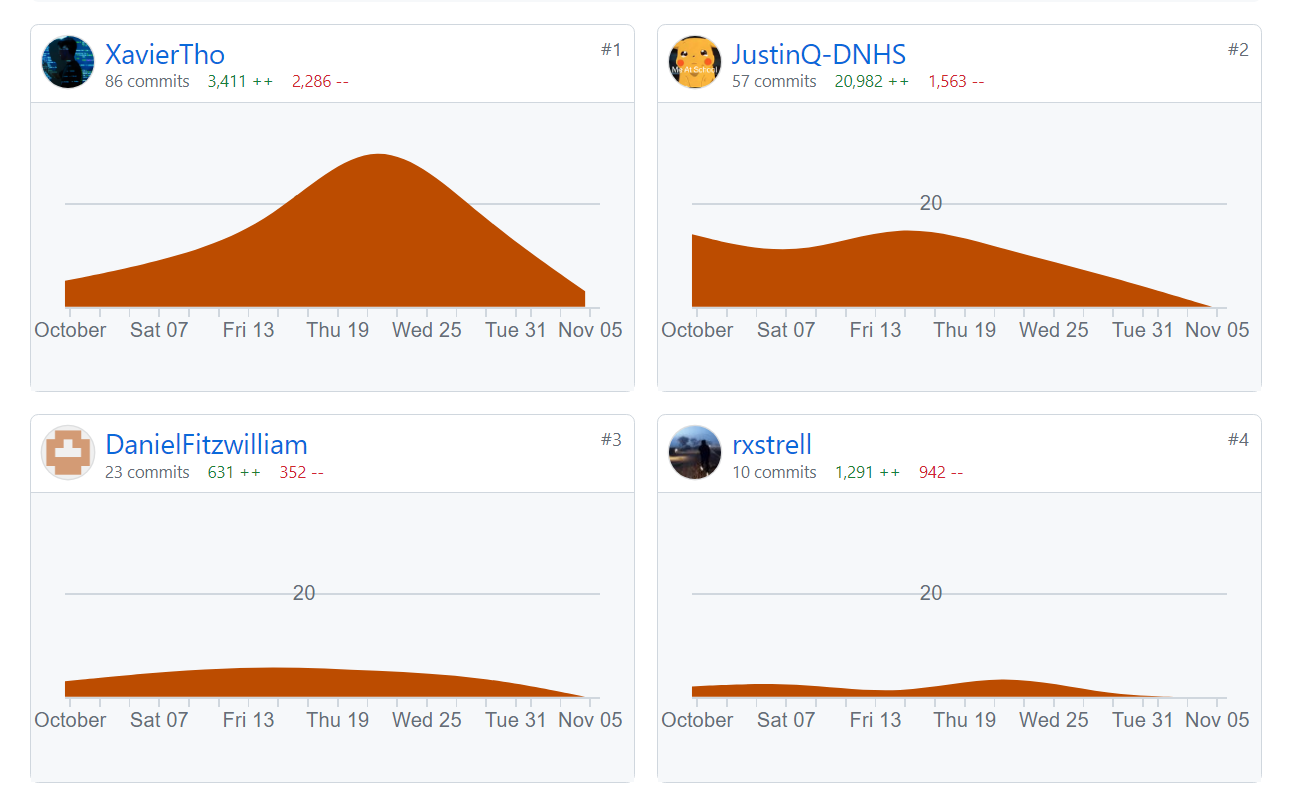
You can see how as the weeks passed, the amount that I did exponentially increased, and only ended up decreasing in the end, as we were finally finished with the project. And while anyone can have a lot of commits, hopefully everything above proves those commits weren’t without meaning. They were purposed by the power to learn & perfect.